My Technique.
I have been invited by a major trade magazine to write a short 700 word piece about my technique for painting pictures. Luckily I recently recorded a video of the process as I created a painting for a collector. So this article puts into words what the video can only show in pictures.

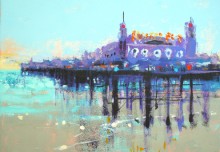
‘London New World’ by Colin Ruffell OAR100608
How I make my pictures;
- First stage. Decide the painting method. What kind of paint, and what surface to paint on. That is pretty easy for me because I really like acrylics. The surface could be paper up to a certain size, or canvas for middle and larger size choices, and here the collector wanted a canvas.
- Shape and size. Decide on the format, square, landscape or portrait. In this case the collector had a space and budget in mind so that wasn’t a problem. But in other circumstances the decision could have been based on a forthcoming exhibition, or a gap in my portfolio, or coverage of a favourite genre, or just a whim. And sometimes because I happened to have spare paper or canvas to hand.
- Colour range and subject. For this job we discussed the colour that would work in the space where the picture would hang. The subject choice was based on pictures of mine that the collector already owned, and others that had been seen recently.
- Research the design options and subject details. For cityscapes this usually means a visit with sketch-book and camera. Sometimes details can be found on the internet. Or both.
- Start painting the picture. I use a broad brush and loose paint to make the first marks on the white canvas. I wanted to establish the horizon and primary focal point.
- Foreground elements, middle ground and distance, shapes and some edges. Still very loose drawing that gets the canvas covered.
- A colour wash to fill in the white canvas gaps between new paint. This is because later I want to paint in the white lights, and the dark darks. So this wash establishes a middle range, and it pulls everything together. Also a wash at this stage can control the whole outcome with the opportunity to go into a specific colour section of the spectrum.
- Blocks of texture with rollers, sponges, fingers, brushes and palette knives.
- Tone range to create the darkest and lightest points. Establish where the tonal extremes are.
- Use colour to establish aerial perspective. Stronger, brighter, crisper and redder in the foreground and bluer, fainter, and more blurry going deep into the distance.
- I use blobs of thick paint applied with a palette knife to catch the bright light points. I also use the side of a small trowel and flat scrapers to make straight lines in raised texture places.
- Focal points. With a small rigger brush to draw details.
- Stand back, look at the picture in a mirror, and upside down. Go away and leave it for a while. Then come back and look again. Repeat steps 6 to 12 where needed.
- Move the picture to somewhere else and explore the effect of different lightsources. Daylight and artificial light. Try dark rooms, direct light, outside and inside. Maybe try it in a frame if one available.
- Take final definitive photograph for crucial archive and Fine Art Trade Guild Original Art Register, plus print publishing potential.
- Lay flat. Could be gloss, matt or silk. I usually prefer silk finish.
- Deliver and hang. Take photo of picture in situ.
- Start again on the next one with a new blank canvas.
- Or use the previous image to explore the possibility of creating a new acrylograph.
- Acrylograph stage one. Establish a master digital file of the existing original artwork.
- Develop the image in Photoshop. This might mean cropping, texturing, flipping, re-colouring, saturating, re-sizing, or any combination to explore variations to make new digital versions of the image.
- Print onto paper or canvas.
- Over-paint the new printed image with extra elements, highlights, textures, to create a new hybrid artwork.
- Repeat previous stage 15.
http://www.colinruffell.com/#!videos/c9d5 ‘New World – London’ OAR100608
699 words!
***LATEST NEWS***
Here at ArtPublish.com we have set up a couple of new groups.
The first group is for Art Lovers and Art Collectors who are interested in our art-work. For members of the group we will be offering discounts, special previews, advance news about exhibitions and new releases, private view invitations, and other things.
The second group is aimed at fine-art professionals. The members are artists, art dealers, publishers, galleries, art teachers, and art investors. Here we share our own 150 years experience as full-time fine-art professionals, and invite others to join in discussions, etc.
And of course some of our readers want to be in both groups.
This is how you can join either group, or both groups.
Please click on the link below that suits you best for more info
C. “I am interested in both please send me all the information.”